Thursday, November 28, 2013

Cranberry Velvet Pie


This is by FAR the best Thanksgiving pie! I make it every year, and it always gets rave reviews. It has the texture and tartness reminiscent of key lime pie. It's a very involved recipe, but I promise you won't be disappointed!

Recipe found HERE

CRANBERRY VELVET PIE
Hands-On Time: 4 1/2 hours
Ready In: 12 hours
Yield: one 9 1/2-inch pie or 11-inch tart
Ingredients
    For the crust:
    1 1/2 cups flour
    1 tablespoon fresh-grated orange rind
    2 tablespoons sugar
    1/8 teaspoon salt
    3/4 cup (1 1/2 sticks) unsalted butter, chilled and cut into 1/4-inch slices
    1 large egg
    1/2 teaspoon vanilla
    For the filling:
    4 cups fresh cranberries, rinsed and picked over
    1/2 cup orange juice
    2 tablespoons lemon juice
    1 1/4 cups sugar (I use 1 1/2 cups)
    Pinch of salt
    6 large egg yolks
    1/2 cup (1 stick) unsalted butter, sliced into 8 pieces
    1 tablespoon fresh-grated orange rind
    Whipped cream for topping (optional) 
Directions
  1. Process flour and orange rind in a food processor until the rind has been thoroughly ground into the flour, about 30 seconds. Add sugar and salt and pulse on and off for a few seconds. Scatter butter slices over the flour mixture and pulse until the mixture resembles cornmeal, about 10 times. In a small bowl, whisk together egg and vanilla. Add to flour mixture and pulse on and off until the dough holds together. Gather up the dough, knead it manually if necessary to smooth it out, and wrap it in plastic wrap. Chill it for at least an hour or up to 2 days.
  2. Divide dough into 8 to 10 pieces. Scatter the pieces evenly in a well-greased 11-inch tart pan or a 9 1/2-inch pie plate. Gently pat the dough into place to make a 1/4-inch-thick crust, coming as far up the edges of the pan as you can. Chill pan for 20 minutes while you heat the oven to 375.
  3. Grease a 14-inch square piece of heavy aluminum foil. Gently fit the foil, greased side down, over the crust. Cover foil with pie weights, uncooked rice, or uncooked beans. Place crust on a baking sheet and bake for 20 minutes. Carefully lift out the foil and pie weights and set aside. Return crust to the oven and bake until golden and baked through, about 15 to 20 minutes longer. Take the crust out of the oven and reset the oven to 275.
  4. Put cranberries, juices, sugar, and salt into a large saucepan. Bring the mixture to a boil, stirring until the sugar is dissolved. Lower heat to a simmer, partially cover, and cook, stirring frequently, until berries are soft, about 25 to 30 minutes. Force cooked berries and any cooking liquid through a fine sieve or food mill to remove all the skins and seeds. (This is a boring job if you use a sieve, so have a book or willing assistant handy.)
  5. Put the cranberry purée into a clean saucepan. Over low heat, stirring constantly, whisk in egg yolks. Continuing to stir constantly over low heat, cook the mixture until it is very thick, about 15 minutes. Then take it off the heat and whisk in the butter slices one at a time. Whisk in orange rind.
  6. Pour the cranberry mixture into prepared crust. Bake until set, about 20 to 30 minutes. Cool completely; then chill for at least 6 hours or up to one day. Serve with whipped cream if I'm eating at your house.

Friday, September 28, 2012

Owlie Friend Pattern


I whipped up this fun little owl, and it has become quite popular. So I thought I'd provide a pattern for how I made it! Please let me know if you have questions, or if you catch any mistakes.  I'm not a professional at this, be nice :)

For personal use only. Please do not copy pattern and sell it as your own. If you make one yourself, please refer people to this site for the original pattern.  Thank you!

**I don't really have a gauge size to offer for this pattern.  My small owl ends up being about 9 inches tall, and my large owl ends up at around 13 inches.  But yours will probably end up being different, depending on how you crochet.  Feel free to add/subract rows to get the size you want.

Ch = chain
Sc = single crochet
Rnd = round
Dec = decrease
( ) = repeat sequence within parentheses

G hook
Worsted weight yarn

Body:
Ch 2. Work 6 sc in second ch from hook.
Rnd 1:  2 sc in each stitch
Rnd 2:  (2 sc, sc) around
Rnd 3:  (2 sc, sc in next 2 stitches) around
Rnd 4: (2 sc, sc in next 3 stitches) around
Rnd 5: (2 sc, sc in next 4 stitches) around
Rnd 6: (2 sc, sc in next 5 stitches) around
Rnd 7: (2 sc, sc in next 6 stitches) around
     * if you want a SMALL owl, like the pink or fuchsia owls pictured, skip to Rnd 10*
     * if you want a LARGE owl, like the brown owl pictured, continue with Rnd 8*
Rnd 8: (2 sc, sc in next 7 stitches) around
Rnd 9: (2 sc, sc in next 8 stitches) around
Rnd 10: BLO sc in each sc around
Rnd 11-31 {small} or 11-41 {large}: sc around
Fold top in half, mark half-way points on either side.
Rnd 32{small} or 42{large}: Dec once at each half-way point. Sc in rest
    For example, the small owl will be: De, sc in the next 28, dec, sc in the next 27
Rnd 33/43: Sc around
Fasten off, leaving a long tail for sewing. Stuff with fiberfill.
Fold the top in half again, with your decrease stitches at either side (these will form the ears)
Whip stitch the top closed.

Wings (make 2)
Ch 2. Sc 6 in second ch from hook
Rnd 1: sc in each
Rnd 2: (2 sc, sc) around
Rnd 3: (2 sc, sc in next 2) around
Rnd 4: (2 sc, sc in next 3) around
Rnd 5: (2 sc, sc in next 4) around
Rnd 6: (2 sc, sc in next 5) around
Rnd 7: (2 sc, sc in next 6) around
Rnd 8-14: sc around
Rnd 15: (Dec, sc in next 6) around
Rnd 16: (Dec, sc in next 5) around
Fasten off, leaving a long tail for sewing.  
Fold flat and sew one on each side of the body

Feathers
Ch 19
Crocodile stitch across x 3 rows 
Your bottom row will be 4 feathers, the next will be 3, and the top will be 4 again.  You can make 5 rows for the larger owl if you want (as pictured)
     *if you don't know how to crocodile stitch, look it up on YouTube. It's so much easier to watch than trying to explain it!
Sew on to bottom edge of body

Eyes
White (make 2)
Ch 2. Sc 6 in second ch from hook
Rnd 1: 2 sc around
Rnd 2: (2 sc, sc) around
Rnd 3: (2 sc, sc in next 2) around
Rnd 4: (2 sc, sc in next 3) around
Rnd 5: sc around
Fasten off, leaving a long tail for sewing
Black
Ch 2. Sc 6 in second ch from hook
Rnd 1: 2 sc around
Rnd 2: (2 sc, sc) around
Fasten off, leaving a long tail for sewing.
Sew black to the center of the white, then attach close together on the head. I added two lines of black out from the pupils to make it look a bit like eyelashes.

Beak
Ch 4, turn
Sc, hdc, dc.
Fasten off. Sew between eyes.


Tuesday, May 29, 2012

Crochet-along!

I'm participating in a crochet-along being hosted by Inner Hooker. It's fun stuff -- you should join, too :)  Here's my week 1 assignment.  Two squares.

Friday, August 19, 2011

Rattle Pattern

I love making these rattles for baby showers -- so quick and simple! And cute!

G Hook
Worsted weight yarn
Ch 15, join with a sl st in first ch you made -- this forms a circle.
Round 1: 2 sc in each st around (30 stitches total)
Round 2: (2 sc, sc) around (45 total)
Round 3: (2 sc, sc, sc) around
Round 4-8: Sc in each
Round 9: (Dec, sc, sc) around
Round 10: (Dec, sc) around
Round 11: Dec around

Line the holes up and stitch them together, stuffing the middle with fiberfill as you go, until closed into a donut shape.
Top with any shape you like! I love to make the flower you can find HERE, then make it a rattle by doing the following:

Ch 2
Round 1: Sc 7 in the first ch
Round 2: 2 sc in each
Round 3: Sc each
Then tie a jingle bell to the inside of the circle (or any kind of rattle), and sew it onto the flower.

See? Easy, right?! I've also made one with a ball or a dog head for little boys.  Get creative :)

(oh, and if you like the hat in the picture, it's on Ravelry HERE; and the headband is a very simple one -- like the one HERE)

Thursday, August 18, 2011

Homemade Teething Biscuits!

Simple, yummy teething biscuits you can make at home!

I've got a chewer at my house.  He chews on anything and everything that comes within reach. So I whipped up some teething biscuits for him (to give my fingers/hair/chin a rest!)
Want to make some yourself? Here's what you need:
1 1/2 C all-purpose flour
3/4 C wheat flour
1/2 C maple syrup
4 T apple sauce (OR peanut butter. OR fruit puree. OR whatever you want!)

Mix all the ingredients together (it'll be crumbly), then knead the dough a few times until it all sticks together.  Then roll it out on a floured surface, and cut with a biscuit cutter, a donut cutter, or two different-sized heart cutters like I did :)

Bake at 200° F for 35 mins, or until slightly golden brown.
Let cool, then hand one over to your little chewer! (or dunk one in milk and eat it yourself! hehe!)
These are very dense -- they're meant to be! Perfect for teething.  Please supervise your little one while they're eating! :)

These will stay good in a air-tight container for about 2 weeks.  Or freeze them, and they'll stay good forever! Well, a long time, anyway ;)


Tuesday, August 16, 2011

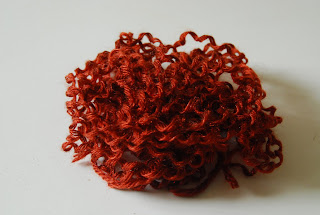
Curling Yarn Hair


Here's an easy way to curl yarn to make curly hair for dolls!

All you need is yarn, a metal knitting needle, and an oven.
(I've only used acrylic yarn for this, so I'm not sure if it would work would other yarns.)

FIRST, wind your yarn tightly around the knitting needle.


Next, put your needle(s) on a baking sheet, into the oven for 10 minutes at 200 degrees F
 Then, simply unwind the curly goodness!
 Voila! Curly hair!  If you only have one or two needles, it'll take you a while to get a good-sized pile like this, but it's so simple, it's almost no work for you.

Now all you have to do is sew it onto a cute doll you made! So cute!

Monday, July 11, 2011

Teething Knots


These teething knots make great baby gifts.  They work up quickly, and are super simple to make.  I made mine out of organic cotton, since they're meant for babies to chew on, but you could make them out of anything you have on hand.

Basically, you just work in rows until the cloth is however long you want it +2-- be sure to figure in the knot -- it will make it shorter. 

Here's an example of what I did:
Single Knot (green)
H (5.00) hook
Worsted weight yarn
1) Ch 30, turn
2) DC in 3rd ch from your hook, and in each ch across
3) Turn, ch 2, dc in each dc across. 
Repeat row 3 until you reach the desired length (mine is repeated twice, for a total of 5 rows)
Tie a tight knot in one end.
Get the knot damp, then throw it in the freezer for a few minutes
Give to baby and let him chomp away!

Double Knot (pink)
1) Ch 37, turn
2) DC in 3rd ch from hook, and in each ch across
3) Turn, ch 2, dc in each dc across
Repeat row 3 until desired length (mine is repeated once, for a total of 4 rows)
Tie a tight knot in either end
Get the knot damp, then throw it in the freezer for a few minutes